Saturday, August 31, 2013

Hello, Kitty!

Lately, I've been dying to make a cake. Dying. With moving, new responsibilities at work and a four month old, my cake making opportunities have been on the decline. I used to just make them because I wanted to. Now, I have to have an actual reason so I can convince my husband it's worth the time. And get him to hold the baby for long periods of time. I've apparently made it so that he never wants to be put down :)

A reason to make a cake recently came up. My niece's 3rd birthday. My sister-in-law has been extremely busy with moving stuff herself and training for an Ironman. I figured why not offer to do the cake and get the last one in before we do our own move? I have boys and know little about the likes of young girls, so I was told my niece likes Hello Kitty, pink and purple. Could she have made that ANY easier?!

I was immediately all over Pinterest. I actually have a board dedicated to cakes and wondered if that is excessive, but I saw a few boards dedicated to Hello Kitty Cakes only, so I no longer feel this way. There are so many cute possibilities, I started having fondant dreams, but I pulled myself back to reality. "She's 3, Brandi. Three year olds don't do fondant." I pinned a few pictures for inspiration and I would totally link to them if Pinterest weren't down right now. Shocking, I know.


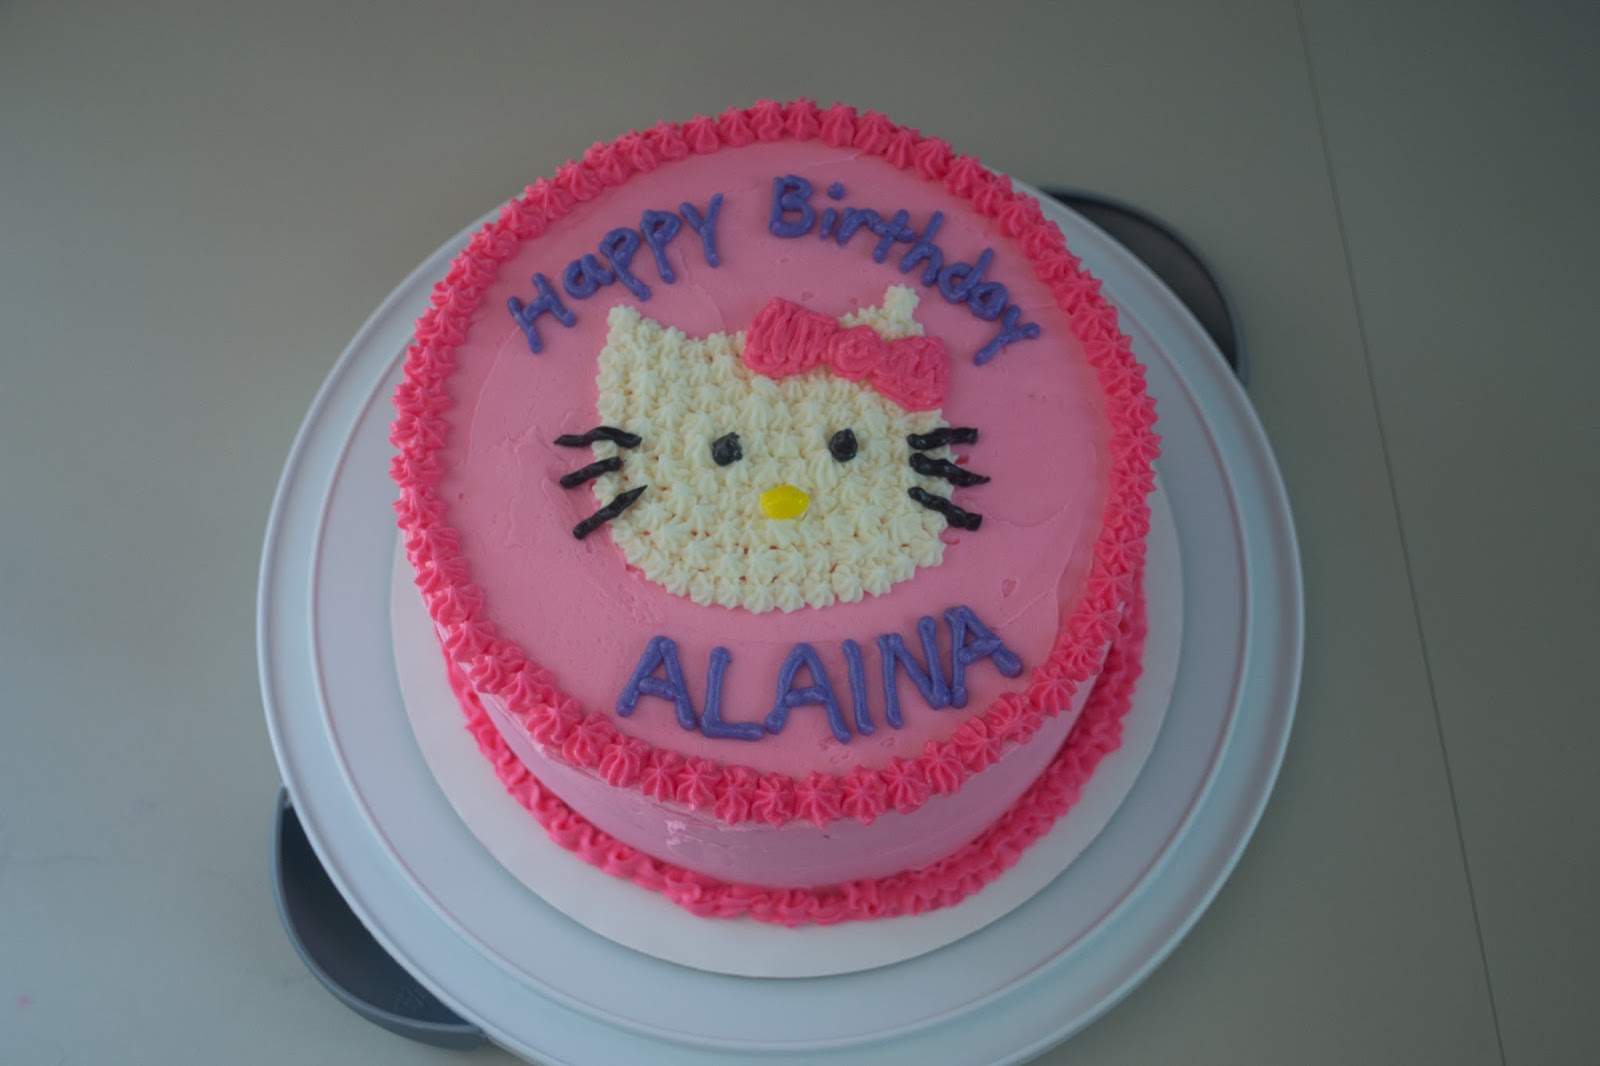
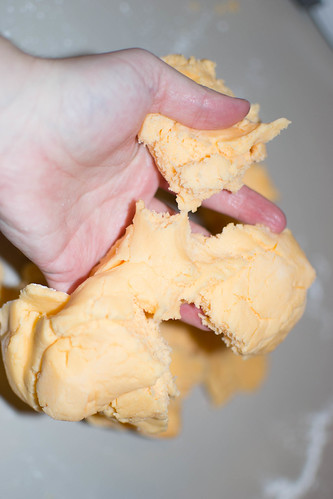
This is how it turned out and I'm pretty proud of it given my lack of decorating skills. For the cake, I used this recipe from Sweetapolita. I like her style. She's a 3 layer cake kind of gal. That's how I roll too. I think we'd get along great.

The cake tasted SO good. My only issue was the frosting. It was so sweet, I think it overpowered the cake taste. I tend to spread frosting a little thick because I love it so that's totally my fault. But frosting is delicious, so I don't feel too bad about it.


This picture is just to illustrate my complete lack of confidence in my cake decorating skills. I printed off a Hello Kitty face and taped it to parchment paper and cut it out. I put that on top of the iced cake and traced along the parchment paper with a toothpick. Could I have freehanded it? Yeah, but it wouldn't look good at all. I'm sure there was probably some easier way to have done it, but I seem to enjoy doing things the hard way. I also have to admit to a little OCD. I couldn't deal with the bow as is, so I cut it out of the cat face, then cut it in half. I put the nice looking half (the one on the left in case you didn't know) on a folded piece of parchment paper and cut the bow on the fold. I needed that bow to be symmetrical. Even looking at it now, sitting there completely lacking symmetry is bothering me. Moving on...


This is how I incorporated most of the purple. I jumped on the color gradient bandwagon because I think it's cute, but I'm steering clear of the "O" word because if I see it again, I may have a meltdown. That probably means I'm on Pinterest to much, so maybe the fact that it's down tonight is a good thing.


And here are the layers. I thought the top one turned out just a little too grayish looking for me. It really could have benefitted from more purple. That bottom layer was just gorgeous. Sorry for not getting all the stuff out of the background. I keep promising that one day, I'll learn to take better pictures and that just never happens. And if you were curious, those Cliffs Notes in the background are for the Odyssey :)

Happy 3rd Birthday, Miss Alaina!

~Brandi


Sunday, July 28, 2013

So THIS is what Unicorn Poop looks like - Cupcakes for Charlie


It's been a long while! Since my last BGC post, I had a baby and have been working on moving, etc. Jess has had tons going on as well. For starters, her son Charlie is in the hospital again. At the risk of publicly providing too much info, I'll direct you to his Facebook page since anything she says there is OK to be shared. https://www.facebook.com/prayersforcharliecole. If you are the praying type, the more good vibes being sent his way, the better.

I know she's normally the cupcake gal and I do the cakes, but I'm switching it up today. Since little Charlie was born, it's been one baffling medical mystery after another. Many long hospital stays. Surgeries. Life going on around all that. Jess has always been a great friend. Even (maybe I should say especially) considering all she has going on. I sometimes lose my mind and complain about things like losing a house I never had because the sellers backed out, or the fact that I can't seem to handle two kids at the same time and she gives advice. And listens. Never once did she tell me to suck it up because she has real problems and THREE kids. If the roles were reversed, I can't say I wouldn't have wanted to do that.

She's an awesome person and I wish there were something I could do to help, but I keep coming up empty. She recently told me about a Facebook group where people get matched with special needs kiddos and run for them.  https://www.facebook.com/groups/irunformichael/.  Charlie already has a runner so I thought, "Why not bake for Charlie?".

I thought about a perfect cupcake for Jess and Charlie and naturally, unicorns came to mind. I'm pretty sure she once said that unicorns are magical so that was stuck in my head. Plus, there was a recent party at her house involving a unicorn mask...So I was off to Google. Until I Googled "Unicorn Cupcakes" I never thought to wonder what unicorn poop looked like. I ended up in a rabbit hole of weird things like the picture below. These were everywhere. You can get your fill of it here. And I even found a picture of a woman with one tattooed on her...


But on to the cupcakes. I can't remember how this came up in a search for unicorn cupcakes (probably through a Pinterest pin) but this is the recipe I used. And it didn't quite work out how I wanted, but I used this video to see a tutorial on how to frost these things. Even if you aren't going to make them, you should check out this video. I watched it 3 times because the way she said "poop" made me giggle. Watch it. Trust me.


I just wanted to post a picture of these because they're awesome. I was just shopping for pretty cupcake liners and came across these and thought they were perfect for this project. They are Reynolds brand StayBrite. They don't fade during the baking process. I liked them because of that and because the plain Reynolds liners I normally use require that I spray them with Baker's Joy prior to baking. These didn't. No, Reynolds is not paying me to say this, but if they'd like to, they know where to find me.


I tried to do this just like Amanda Cupcake told me too but it ended up looking like this. There's actually pink in there too. Well, I didn't do it JUST like she said, so this happened on a few. I didn't stop filling at the halfway mark like she said. I also *might* have been lazy and instead of moving the oven rack for the little pan with two cupcakes, I may have jammed it in next to the big pan so it was slightly tilted.


They must have been alright, my son ate one before I could get it frosted.


I didn't quite get the swirling the way I wanted. I had 4 different colors and only 2 were prominent. Hey, we can't all be Jess ;) I also wanted to use a Wilton 1A size tip to frost these since it's more poo-like than a star, but I can't find that tip anywhere. Must be a hot item here in KC because I've been looking at multiple stores.

As a final Jess-like touch, I sprinkled them with pearl dust. You can't see it well here, but I tried. I think the application was wrong. I learned after I got it home, it's supposed to be brushed on. Oops. That would have been helpful. I've got that shimmery stuff is ALL over me. Luckily, I'm not going into the office tomorrow or people will think my weekend was much more wild than it really was. Speaking of not going to the office, now I don't know who will eat these things. 

Charlie, I hope you love them and that you get well soon!

~Brandi


Monday, April 8, 2013

It's our Blogiversary...I think

Technically, I'm not sure if the blogiversary comes a year from the date of the blog's creation or it's first post. Since I'm such a slacker, if it's the former, the blogiversary was about 8 months ago. Oops. So we'll just call it a year from the first post, OK?

Even though I didn't make it from scratch, the Peep Cake post is still one of my favs. I would love (like most bloggers on their first anniversary) to talk about how far I've come, but as I review the post, I'm still biting off more than I can chew, still making tons of mistakes, and still taking terrible photos. But it's completely fine, because most importantly though, I'm still having fun.

After a long day today of trying to potty train my toddler, my 38 week pregnant aching body just wanted to go to bed. Instead, I easily talked myself into making a blogiversary cake and I quickly found myself relaxing. Something about cake does it every time.


This one was a little different than what I normally do as it was only 2 nine inch layers instead of the 3 I usually insist on. It almost looks tiny to me. But there were 3 reasons I chose it. 1 - I was perusing Pinterest and came across a cake recipe that claimed to be The most AMAZING buttermilk chocolate cake EVER! That sort of claim is hard for me to ignore. 2 - I just happened to have buttermilk on hand. This was happening. 3 - One word. Ganache.


While I was putting the batter into the 9 inch pans, I got the sense that my 9's were going to overflow if I used all the batter. It was the perfect excuse to make a baby 6 incher for myself. It is my blogiversary after all. And since I'm sending the big one to work with my husband, I still get a piece this way. Win! And the best part is that I don't have to make it pretty since it's just for me.


Nothing says happy anniversary like a piece of cake. Can't believe it's been a year! In the past year, Jess has had a baby and now I'm just weeks away, but I hope we still get some time to ourselves once in a while to bake some cakes and put some new posts out here. It saves our sanity! :)

~Brandi


Sunday, March 24, 2013

Curious George Birthday Cake

My baby turned 3 this weekend :( I feel like every other parent who just cannot believe it when their kids grow up. Time really does fly people! On to cake before I start crying again...
When I saw this Curious George Cake on Pinterest, I KNEW I had to make one, but I still wasn't sure. My son loves so many things, it was going to be hard to narrow down a theme. I was on the fence, so I posted all the possibilities to our Facebook page and the commenters seemed to agree that George was the way to go.


The above is how I posted it to Facebook. I ended up making some minor changes. I forgot that I wanted to incorporate some airplanes (another one of my son's favorite things) as well as the number 3 candle. So it ended up looking like this:


I'm notorious for complaining about my work. I'm just not a good decorator. I frequently tell people that I don't do pretty, I do delicious. But this time was a little different. I made tons of mistakes and as usual, I'll go on about most of them, but I was still happy with how this turned out despite the fact that it wasn't necessarily what I was going for. 

So here's how it came together. The recipe is one of my favorites from Sweetapolita. Just the cake. So moist and delicious. I have tried and cannot make swiss meringue buttercream so I stuck with a basic buttercream recipe. Butter, powdered sugar, milk and vanilla. I didn't do much measuring, so I'm no help there, but it might shock you to know that I used a grand total of 10 sticks of butter in all the frosting I made today. Yikes. 


I couldn't find a Curious George font, so I just used something called "Dancing Script" in Google docs and printed off what I wanted. I also printed off a Curious George face from PBS kids. I taped these to my counter and then taped parchment paper on top. My plan was to add Wilton food coloring to candy melts and make it so I could peel them off and stick them on the cake. I dipped my first bit of black dye into the candy melts and it immediately hardened. I stared at it for a bit, then put it back in the microwave. Still hard. I added shortening to it and microwaved again. Still hard. Texted my blogging partner in crime to complain about this. She responded that they have separate dye for candy melts. Of course they do. I need to start filing my questions with her PRIOR to taking on big projects. 

I ended up using the black coloring to make the smile and nose and hoping it worked. Luckily George is brown, so I just had to add chocolate candy melts to the white ones I already had. I also wanted to put the face on the side of the cake like the inspiration photo, but that didn't work out. Not a huge deal though. 
I also wanted to use an aqua color to pipe next to the red border, but it turned out more green than aqua. And that was the last of my buttercream, so I decided that the cake was good just red and yellow :) And since I couldn't put red tint in the candy melts, I ended up having to freehand the text. It actually turned out alright despite not being able to trace.


All in all, not what I was going for, but the boy was very pleased. He walked up to it and said "It's amazing". After that, I couldn't think it was anything but perfect and worth every bit of effort put into it. Happy birthday kiddo!

~ Brandi


Saturday, February 23, 2013

Peanut Butter and Chocolate...Cupcake Style

Recently my partner in blog Brandi posted an amazing looking peanut butter & chocolate cake. I recently dipped my toes into the world of peanut butter and chocolate as well only I did it cupcake style! Recently my husband had a birthday and cupcakes were required. He is a diabetic and rarely eats things like cupcakes so his birthday cupcakes are a big deal. Took him weeks to decide what kind he wanted. In the end he decided on German Chocolate Cupcakes....until I mentioned something about peanut butter cupcakes with chocolate frosting. He got very excited and decided that is what he wanted!

These scream birthday to me!


It did not take me long to settle on a recipe for peanut butter cupcakes. Once again I turned to my girl Martha Stewart. I made her recipe for peanut butter cupcakes with one sneaky addition. I added Reese's peanut butter chips to the batter. They don't melt but they get soft and delicious and add an extra burst of peanut butter to your cupcakes. Now who the heck does not want an extra burst of peanut butter in their cupcakes? If you find someone who says "yeah, that's not for me" walk away because let's be honest you don't need those kinds of people in your life!

My arsenal!


Now you see that bag of jelly beans in the corner? Those are delicious. I first found them in the bulk bin at the grocery store and then later found them in those small bags. They are chocolate covered strawberry jelly beans but they are not the same texture as jelly beans they are softer and really quite delicious. They added that certain something I needed to the cupcakes. Now Martha Stewart has you adding peanut butter frosting to her cupcakes. But it's peanut butter and peanut butter needs chocolate. So I whipped together a chocolate cream cheese frosting and slathered the cupcakes with it. I will post the recipe below!

I was running late and my husband doesn't care if frosting is piped or not


The frosting was pretty tasty but it wasn't my favorite. I prefer frosting made with melted chocolate makes it richer but this frosting was made with cocoa powder which is still good but not my personal preference. Everyone else loved them and that's all that matters! I of course topped them with a nice festive appropriate birthday party sprinkle! I again made them for Valentine's Day and used Valentine's Day sprinkles because that's just how I roll.

My arty picture, every blog needs one


Chocolate Cream Cheese Frosting:

2 sticks unsalted butter - softened
1 8oz block cream cheese - softened
1 tablespoon vanilla
1 bag powdered sugar
Cocoa powder
Brown icing coloring (only if wanted)

Cream together butter and cream cheese. Add vanilla. Add as much cocoa powder as you want. You can be as light or as heavy handed as you choose in regards to chocolate. Then again add as much powdered sugar as you want. Depending on the level of sweetness and thickness you want/need. Then if you are unhappy with the color add some brown icing color to make it a richer brown. I am aware this is not much of a recipe but for me frosting is an experiment. I just start throwing things into the mixing bowl and hope for the best.

Those are Martha Stewart cupcakes in my Martha Stewart cupcake carrier


I'm going to include the Martha Stewart recipe as well. I linked it above but as of right now our links are not showing up a different color so you may miss it!


Ingredients

  • 1 3/4 cups all-purpose flour
  • 3/4 tablespoon baking powder
  • 1/2 teaspoon salt
  • 1/4 teaspoon baking soda
  • 6 ounces (1 1/2 sticks) unsalted butter, softened
  • 1 1/3 cups sugar
  • 2/3 cup natural, creamy peanut butter (I use Jif natural because it was on sale)
  • 3 large eggs
  • 1/2 cup sour cream
  • 1/2 teaspoon pure vanilla extract

Directions

  1. Make cupcakes as directed in Basic Cupcake How-To, adding peanut butter before adding eggs. Use sour cream and vanilla as wet ingredients. Once cupcakes are cool, frost tops with peanut butter frosting. Place a dollop of jam in center of frosting. Decorated cupcakes will keep, covered and refrigerated, for up to 2 days.
It was delicious and look my teeth marks!


Sunday, February 17, 2013

Chocolate Truffle Buttercream

A month ago my niece Zah turned 14 and delicious birthday cupcakes were definitely in order. Zah has been a chocolate fiend since she was a baby and I knew something super chocolatey and delicious was in order. I decided to make two batches of cupcakes both chocolate (just used a basic chocolate cake recipe) one with a white chocolate cream cheese buttercream and the other batch topped with what I call chocolate truffle buttercream.

A few years ago before I realized that I could make my own frosting recipe I found the William Sonoma Chocolate Buttercream Frosting on their website. I fell in love with it. Rich, delicious, easy to make, easy to pipe. For this occasion I was looking for something a bit richer so I decided to sub out the milk and replace it with....heavy whipping cream. The change was out of this world delicious! It was like eating the filling of a delicious, wonderful truffle. If you are looking for a boring regular non rich chocolate buttercream go ahead and make it with the milk instead of the heavy cream, I promise not to judge you.

It's unsweetened but I still want to dive in


At first I didn't use quite enough cream and the frosting was really thick and I had piping issues. I usually use the Wilton 1M tip but I could not get it to work. So I brought out a different tip and the results were what I call...the dog poop swirl cupcake. I quickly snapped a picture and sent it to my partner in blog Brandi because I knew only she could appreciate the dog poop swirl. Once I thinned it out a bit more with some more cream it would have been easy to use the traditional 1M but I didn't want to fill another bag so I just went ahead and embraced the dog poop swirl.

 
It's delicious but it looks like...well yeah

I decided to just go with some sprinkles for decorations as I could get my niece to give me any information on what she wanted beyond chocolate. On the cream cheese buttercream cupcakes I originally placed a chocolate covered gummi bear but...yeah there is a theme here it looked like poop. So I took them off and ate them. I figured there was enough poop happening and no reason to pump it up. This was supposed to be an appetizing blog post but now I fear I mentioned poop too many times. oops. To distract you I will once again plug one of my favorite sprinkle sites Sweet! Baking Supply. I will also show off my super arty pictures that I took of my sprinkles.

Ooooh Arty!

The white chocolate cream cheese buttercream cupcakes were equally as delicious. Just a basic recipe I just kind of throw in whatever I have around the house. I like to do half salted butter and half unsalted butter I really think it gives it more depth. But it's a personal choice I know people who would never even fathom putting salted butter in their frosting and that's okay. Frosting is personal people, make it your own.

Hey, look! No poop! 

As for the chocolate truffle buttercream I mentioned before here is the link to the original recipe from Williams Sonoma. Below is my modified version. Both versions are great...but I am biased towards my own personal version!


Ingredients:

  • 8 oz. unsweetened chocolate, chopped
  • 6 cups confectioners' sugar
  • 16 Tbs. (2 sticks) unsalted butter
  • 6 Tbs. heavy cream, plus more, if needed
  • 2 tsp. vanilla extract
  • 1/4 tsp. salt


Directions:

Have all the ingredients at room temperature.

Put the chocolate in the top pan of a double boiler set over but not touching simmering water in the bottom pan. Stir until the chocolate is melted and smooth. Let cool to room temperature.

In the bowl of an electric mixer fitted with the flat beater, combine the confectioners' sugar, butter, the 6 Tbs. heavy cream, the vanilla and salt and beat on low speed until combined, about 1 minute. Stop the mixer and scrape down the sides of the bowl. Increase the speed to medium and beat for 2 minutes, then reduce the speed to low. Add the chocolate and beat until combined, then increase the speed to medium and beat for 1 minute more.

If the frosting is dry, add more heavy cream, 1 tsp. at a time, until it is creamy but still holds peaks. Makes about 4 1/2 cups.

Now please enjoy a few more pictures of cupcakes, yay cupcakes!

Professional Sprinkle Placer is my day job

Look I have a fancy cupcake plate! For blog pictures!

Shaking things up with stars!

Friday, February 15, 2013

We go together like Peanut Butter and Chocolate

On Monday, I got an instant message from someone I used to work with. I'm still with the same place, just in a different position. Anyway, the man's idea was genius. A few years ago, I brought a cake to work that his wife got to try and she loved it. He thought it would be great to give her this cake for Valentine's Day. I'm not a huge fan of flowers for Valentine's Day. The prices are jacked WAY up just because it's February 14th and the flowers just die in a few days. Cake doesn't exactly last long either, but you can't eat roses, yo.


But THAT ^^^ you can eat. And love. And gain a few pounds eating. I don't have a food scale at home, but I think that thing weighed at least 10 pounds. I think I just gained one looking at this picture again.
If you want to try some - and I highly recommend that you do - You can find the base recipe here. I left out the peanut brittle and the ganache. On a side note, I've also had that cake with the ganache and it's equally amazing. I did change up the frosting recipe a bit and LOVED it. The only thing that stopped me from eating it with a spoon is knowing that I needed every bit for this cake. Full disclosure though, I did save some left over and I have had a spoonful of it.
I used two 8oz blocks of cream cheese, 1/2 Cup unsalted butter, 6 Cups powdered sugar and I did stick with the 2/3 Cup of peanut butter. Try it. You'll thank me.

This cake is really really soft and hard to decorate (even cooled) so I freeze it prior to decorating and have good luck with it that way. The decorating is actually the hardest part. But it's not because of the soft cake, it's because of this:


Hey Reese's, I've got an idea. How about you sell a bag of those things unwrapped? They can make life so much easier with a simple change. I could have asked for help, but they are my husband's favorite, so I doubt many of them would have made it onto the cake :)

I do need to say that I got the decorating idea from one of my favorite food blogs, Annie's Eats. Oddly, that recipe and picture have since been moved or removed and I can't find it anymore. Not sure what's up with that, but if you search for it, you can find pictures on other sites.

And because I can't post without sharing some stupid thing I did, check this out:


I was on the second step in the cake batter section. Just mixing away and had a thought. This chocolate cake sure doesn't look very chocolatey. Hmm... I could be all stereotypical and blame my blondeness. Or my pregnancy giving me baby brain. It is what it is :)

And just so I end on a positive note, here's a close up. Enjoy!


~ Brandi


Wednesday, January 23, 2013

About Us & Instagram

It came to my attention recently that most people don't realize that there are two people blogging on this blog. Which is fair we just started blogging with no real introduction. So the people on my (my = Jessica BTW) facebook think this is my blog and the people on Brandi's facebook think that this is her blog. Of course...they are both correct!

I am Jessica I live in Seattle. I'm married with 3 kids. Brandi lives in Kansas City, is also married and with one kid and one baby on the way! We "met" a few years ago on the internetz and our friendship has blossomed over the years. We discovered we had a lot in common from our history of being stabbed (just with pencils), our love of rap music and most of all our love of cake (and sir-mix-alot).

One day on the facebook Brandi posted that she wanted to start a blog where she went through a cake cookbook and made every cake in the book. Sort of a Julie & Julia sort of blog. Me being totally obnoxious jumped on it and said "OMG YES! Do it! Not only should you do it, but I will do it with you!" Now I will never know if she actually wanted to do the blog or if she actually wanted to do the blog with me because I got all eager puppy and jumped all over it and never thought about actually asking or anything. Oops.

Brandi picked a book of cakes and I picked Martha Stewart's cupcake book. As the months went by we both were busy and a bit unmotivated. Then I found out there is already a blog doing Martha Stewart's cupcake book. So it evolved to where we are just doing whatever we want and Brandi does cakes and I do cupcakes.

There were a lot of names tossed out while naming this blog. I was honestly (and still am) rather fond of Bone Thugs & Cakery but I guess it probably doesn't make a whole lot of sense or flow well but I loved it all the same. After tossing around many names we settled on Baby Got Cake. Brandi went and snatched up the domain name and the name on blogger.

We discovered however that there are a lot of people on the Internet squatting on various sites with the name baby got cake. Most accounts are going unused and it's so frustrating. So recently taking a page out of the Internet squatters book I went around and snatched up the name wherever we could. Unfortunately a lot of places it was already in use so I had to go with BabyGotCakeBlog which I suppose is better than nothing. So now we may never need a GMail, or a tumblr (ummm what's a tumblr???), a Flickr or an Etsy shop but if it ever comes up, the names are ours!!! We even have a twitter (and we are following sir-mix-alot) despite the fact that both Brandi & I are a bit twitter unaware.

The one thing we do know how to use (um sort of) is Instagram. So far all that we have posted is a bunch of pictures of cupcakes that I found in my phone but hopefully we will start using it more. So everyone should follow us at BabyGotCakeBlog on Instagram!

So in closing we have a lot of hope for this blog...mostly that it goes viral and a movie is made about it. I haven't decided who should play me yet, I am still considering actresses!

Sunday, January 20, 2013

I like 'em round and BIG

Who doesn't? Square/rectangle cakes are boring to me and the bigger the better. I think it's been a while since I made a cake that wasn't a three layer. And since it's for me, I can have it however I want. Round and big it is!
I made a Chocolate Cream Cake that I've made several times before. It comes from this cookbook. It's basically a devils food cake with a very smooth buttercream inside and a chocolate cream cheese frosting on the outside. SO yummy!


I had to take a shot of the cream layers because once you put the frosting on, you have no idea how good it looks until you cut into it.


See what I mean? Looks good and chocolatey, but you have no idea the goodness you are about to cut into.


I was a bit uneven in the cream filling distribution, but I promise that doesn't take away from the flavor. Nom, nom.

~Brandi

Sunday, January 13, 2013

Back in the Saddle (Oven?) Again

Well so as it turns out giving birth to a baby with a incredibly rare genetic mutation that causes a host of problems from hydrocephalus to a rare form of genetic cancer (rare is the word of the day!) kind of knocks you on your ass. All the things you used to do go by the wayside and everything changes. Having a baby changes everything as it is but having a special needs baby with cancer that you weren't prepared for changes it in ways you can't even imagine. It also means that people treat you differently and are always going out of their way to make life easier for you. So when it's a holiday or even and you say "can I bring anything?" they say "OMG no, of course not, you have too much going on please don't!" Which is a nice sentiment, it really is. Unless you are craving some sense of normalcy and miss things like baking cupcakes more than anyone even realizes. So when I heard at Thanksgiving that I did not have to bring anything I thought "cha! I'm totes bringing cupcakes and there is nothing anyone can do about it".

Well when your life is turned upside down and your brain is fried and you don't know whether you are coming and going and you decide to make cupcakes where do you turn for inspiration? I obviously don't even need to answer that question because obviously I go straight to my homegirl Martha Stewart. Thanksgiving = pumpkiny deliciousness. So I decided to give Martha's (word to my homie!) Pumpkin Cupcakes a try.


I topped them with a brown sugar cream cheese frosting. A basic cream cheese frosting with 1/2 cup light brown sugar mixed in. If I had put more time and effort into it I would have added some browned butter to the frosting as well to give it another level of flavor.


At the last minute I decided to top them with a candied pecan. I hastily looked up a candied pecan recipe and threw it all together. I'd love to share the recipe and tell you they turned out amazing but...no they turned into a big giant candied mess of grossness. I tossed them oh and the pan I made them in because they were stuck in the pan. I sent my husband to the grocery store up the street to their amazing bulk bin and had him get me a bag of candied pecans to top the cupcakes with. I really like the bit of crunchy sweetness that they added. I was taking them to a get together where there were some nut allergies so some cupcakes just got some extra sprinkles instead.


I'm not sure where I got the fall sprinkles but if I had to guess I would assume Sweet! Baking Supply because they have an incredible selection of sprinkles. I know sprinkles are "suave" or anything but I really do think they add a bit of fun to a cupcake and I think cupcakes should be fun.


In December my mom asked me to make her some cupcakes for her work Christmas party. She gave me free reign to make whatever I want and I was very excited to get creative! I'm including these as a pure cupcake porn blog bonus as I'm not really including the recipes. It's January and Christmas is over and eggnog cupcakes aren't happening again for another 11 months! This first batch was french vanilla cupcakes with eggnog frosting. Of course I added a variety of Christmas themed sprinkles.


I fully admit I have a lot of Christmas themed sprinkles. Sprinkles are around $2 a jar and they are incredibly hard to resist.


The other set of cupcakes I made looked incredible. As these weren't for me I never actually got to sample one. Dark chocolate cupcakes, peppermint white chocolate butter cream, chocolate ganache swirl & chopped candy cane Hershey kisses & topped with a starlite mint. The first batch I put a dollop of ganache on the mint but it looked like a creepy eyeball so I didn't repeat it for the other batches.


I definitely contemplated throwing some sprinkles on them because why not go overboard but I reigned it in at the last minute.


It's a new year, a new blog header (LOVE IT) and hopefully in the months to come I will be able to regain a bit of normalcy and make a few batches of cupcakes here and there.


Saturday, January 5, 2013

Adventures with Fondant Icing

I'm just going to start with the finished product. This was a new experience and I have a problem with being too wordy, so this will save people lots of time and scrolling :)


Now on to the wordy backstory. I'm known around these parts (meaning where I work) for making cakes. It's not unusual for me to get a request, but this one was different. It had me scared. Why? One word. Fondant.  I have never had the guts to attempt it. I've had some unfounded biases against using it too. First, I have heard that it tastes gross. Being a buttercream girl, it's hard for me to replace that with something that doesn't taste nearly as good. Next, I heard it's a huge pain to work with. That alone was enough to keep me away. I like my cakes easy.

However, fondant cakes are SO pretty. I'd never gotten the chance to work with it before (mostly because I avoided it). No better time than a new year to try something new, right? Also, the mama who needed the cake for her one year old's birthday was OK with the fact that I was a fondant newb. Challenge accepted. 

The cake was to be lemon flavored, so I made the cake I've done before in this post and just left out the blueberry part of it. That was the easy part. I made the cake one night and decided to dirty ice and give it a fondant cover the next night. Being a newbie to fondant, I decided to defer to the experts at Wilton. Call it cheating, I'm OK with that :)


 I found some varying opinions online about how to roll fondant. Use cornstarch, no - use powdered sugar. Roll 1/8 inch, no - roll 1/4 inch thickness. I heard some warnings about cracking and showing wrinkles if too thin so I went with 1/4. In retrospect, that was probably too thick. Here it is rolled and covered. At this point, I think I'm doing OK. Kinda looks like a dress. And that's how some of the youtube videos described it so I thought I was alright.


Then, I started tucking the bottom. I quickly realized that this was not going to be easy. No matter what I did, I just could not get rid of the wrinkles at the bottom. I smoothed and smoothed, but it wouldn't give and the top was starting to stretch. I started to wonder if I bit off more than I could chew. I hoped that the fondant ribbon I was going to put on the bottom would cover most of the wrinkling. I decided to head to bed at 11:30 that night with it looking like this. 


Then came night three. Cake was due the next day and the pressure was on. Thing is, I was out of fondant because I had only bought enough for the cake, apparently. Another thing all the videos say is to buy more than you think you need because fondant keeps for a long time. Noted. I'm not sure what got into me, but I thought I could make it. I ran to the grocery store and bought items for a recipe I saw that claimed to taste like buttercream. I won't post it, but I will say if you come across such a recipe, go ahead and avoid that. It never got to a fondant consistency so I couldn't even roll it, it just kept breaking apart and never lost it's greasy sheen from the shortening. Very disappointing. I will say, I should have just asked for Jessica's (BGC's cupcake blogger) advice before I even started. She had never even heard of buttercream fondant :)


At this point, it was 9:30. Just in case the buttercream recipe fell through, I had also purchased marshmallows earlier in case I needed to make marshmallow fondant. I decided against more unknown and headed to Wal-Mart to buy more fondant. Glad I could count on them for a late night cake emergency :) I was a bit worried though that I would be up all night. But once I got back home, it was like things had clicked. I dyed the fondant to match the party colors, rolled it all out, cut the polka dots and had it all together just before midnight. This is actually good for me! Here it is again. Despite it not being perfect, I'm still really proud of myself.


Overall, it was challenging. This is totally normal from everything I read/saw on youtube. Almost every video I watched stated that it takes lots of practice to get it right, so that makes me feel better. I was also able to put that other bias to rest. I tasted it when I was done and I didn't cringe. It was actually not too bad! It's no buttercream, but it's certainly not gross :)

Now that I sort of have a clue as to what I'm doing, I might be using fondant on my son's birthday cake. We shall see. Either way, I'd definitely try again.

Almost forgot to add that the cake is modeled after the topper on this party post. I will update again when the mama does her post. It was SUCH a cute set up!

~Brandi